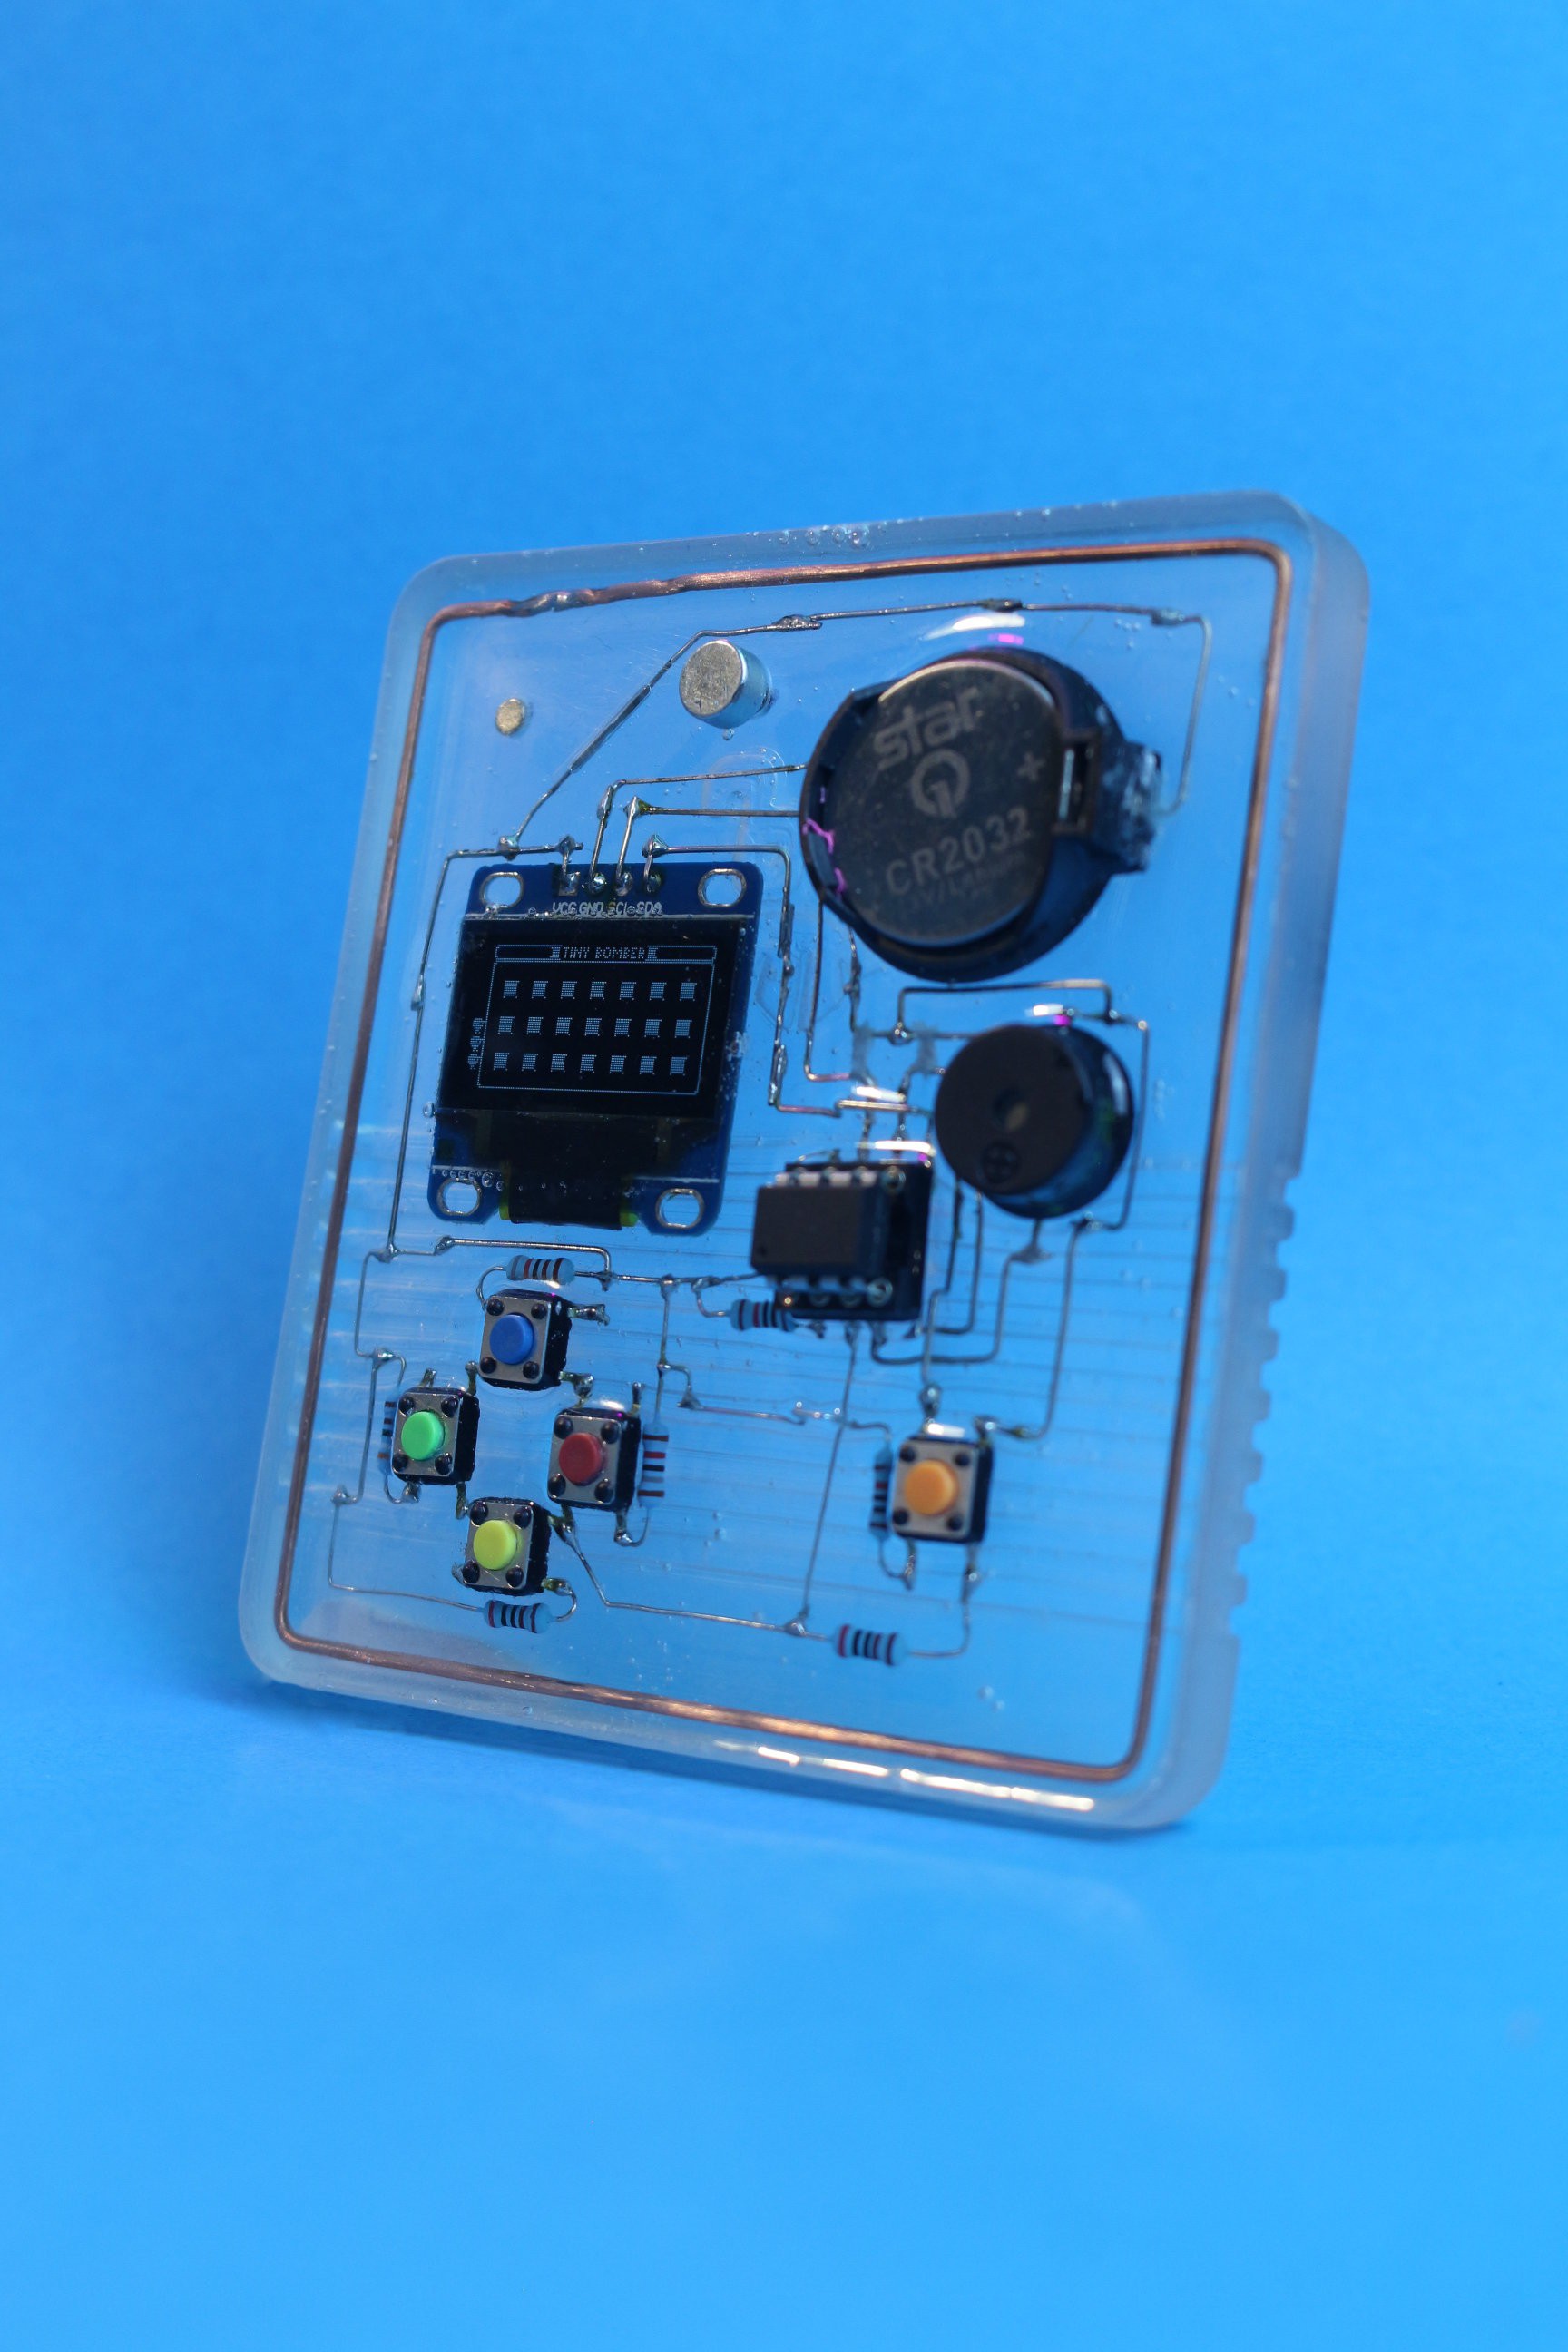
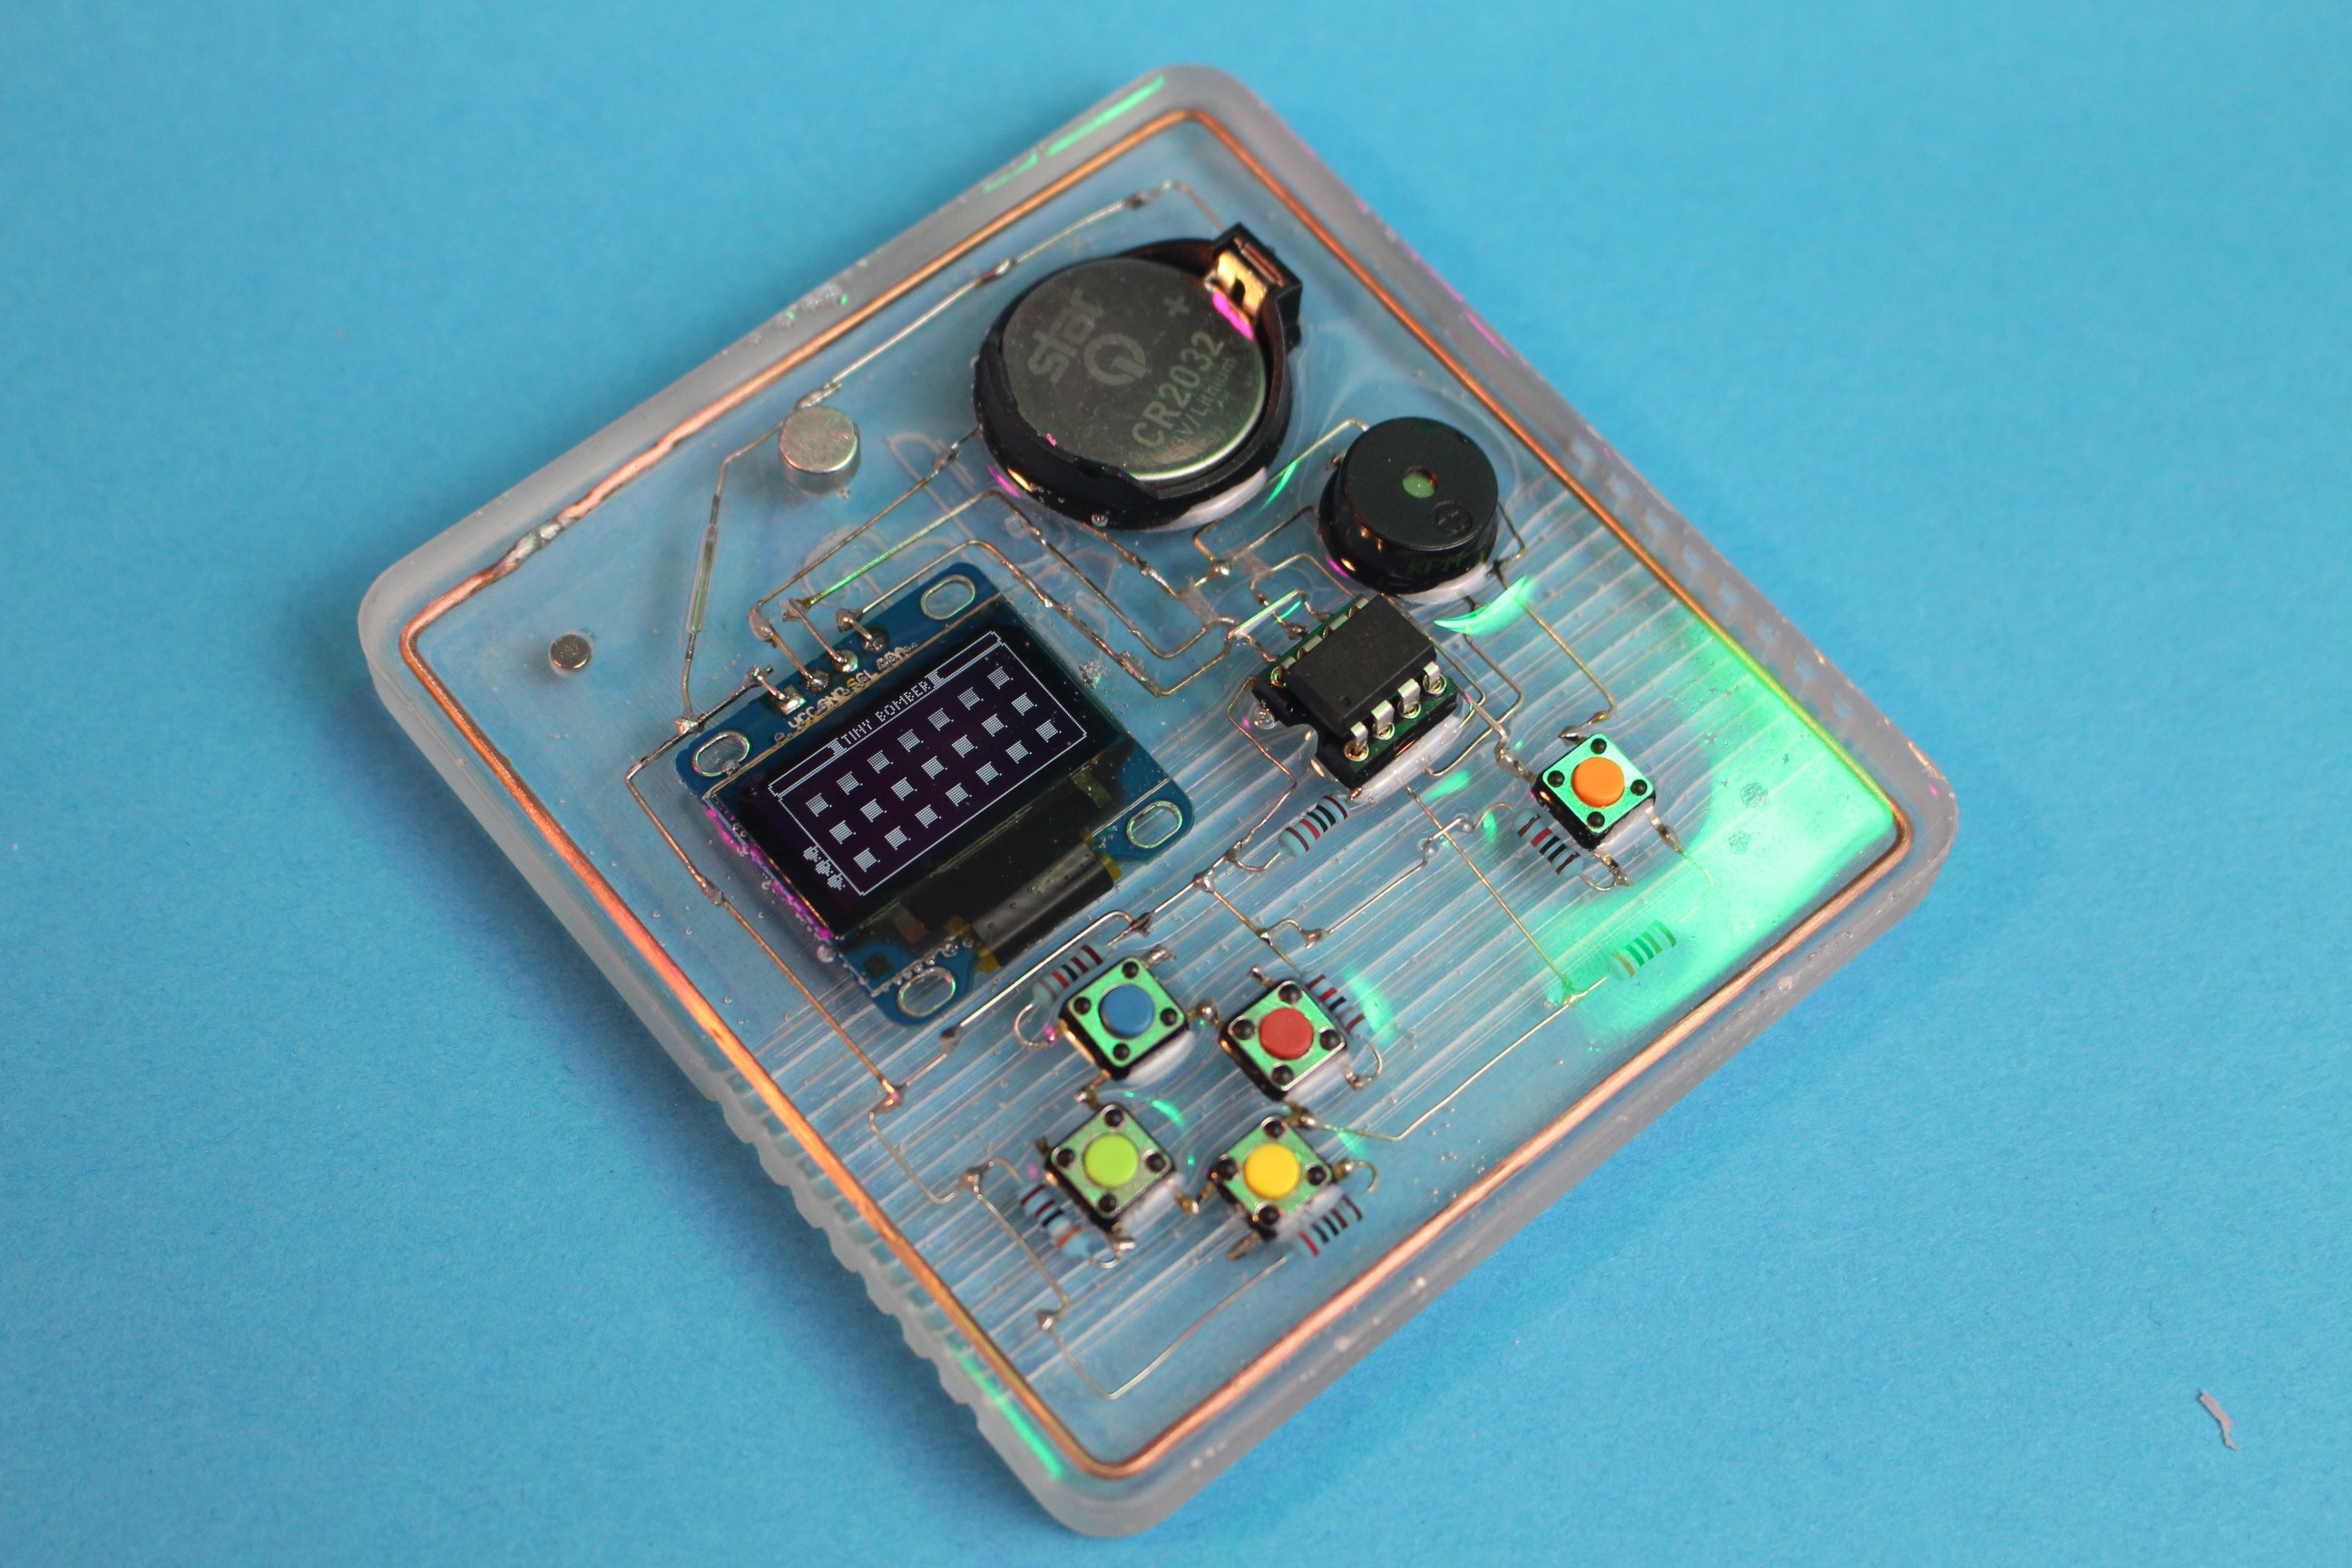
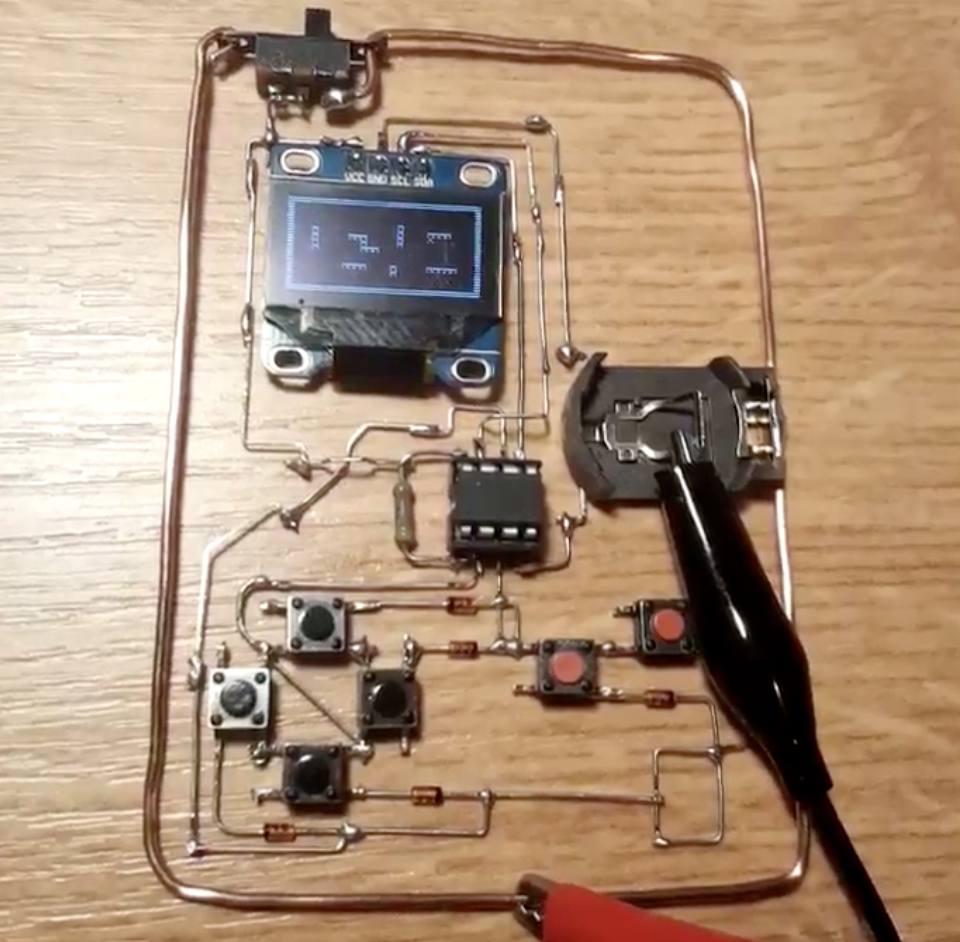
Skeleton Attiny85 Handheld I2C OLED connected to an Attiny85 and a Charlie-plexed button matrix
The most minimal handheld I could think of. 6 buttons that will probably do weird stuff, when you press more than one. Coin cell powered, I saw people use the oled and an attiny on a coin cell before. Never had an OLED on an Attiny85 before, so that was a good project for it. Always loved to look at the free form soldered things.
Skeleton Attiny85 Handheld | Boom, resin! 2019-04-11 17:45:50
done! :)
https://cdn.hackaday.io/images/8686791554997599463.JPG
https://cdn.hackaday.io/images/4411331554997605865.JPG
https://cdn.hackaday.io/images/3892361554997605921.JPG
https://cdn.hackaday.io/images/430291554997610043.JPG
Skeleton Attiny85 Handheld | Boom, resin! 2019-04-11 17:45:50
done! :)
https://cdn.hackaday.io/images/8686791554997599463.JPG
https://cdn.hackaday.io/images/4411331554997605865.JPG
https://cdn.hackaday.io/images/3892361554997605921.JPG
https://cdn.hackaday.io/images/430291554997610043.JPG
Skeleton Attiny85 Handheld | Boom, resin! 2019-04-11 17:45:50
done! :)
https://cdn.hackaday.io/images/8686791554997599463.JPG
https://cdn.hackaday.io/images/4411331554997605865.JPG
https://cdn.hackaday.io/images/3892361554997605921.JPG
https://cdn.hackaday.io/images/430291554997610043.JPG
Skeleton Attiny85 Handheld | Boom, resin! 2019-04-11 17:45:50
done! :)
https://cdn.hackaday.io/images/8686791554997599463.JPG
https://cdn.hackaday.io/images/4411331554997605865.JPG
https://cdn.hackaday.io/images/3892361554997605921.JPG
https://cdn.hackaday.io/images/430291554997610043.JPG
Skeleton Attiny85 Handheld | Boom, resin! 2019-04-11 17:45:50
done! :)
https://cdn.hackaday.io/images/8686791554997599463.JPG
https://cdn.hackaday.io/images/4411331554997605865.JPG
https://cdn.hackaday.io/images/3892361554997605921.JPG
https://cdn.hackaday.io/images/430291554997610043.JPG
Skeleton Attiny85 Handheld | Boom, resin! 2019-04-11 17:45:50
done! :)
https://cdn.hackaday.io/images/8686791554997599463.JPG
https://cdn.hackaday.io/images/4411331554997605865.JPG
https://cdn.hackaday.io/images/3892361554997605921.JPG
https://cdn.hackaday.io/images/430291554997610043.JPG
Skeleton Attiny85 Handheld | Boom, resin! 2019-04-11 17:45:50
done! :)
https://cdn.hackaday.io/images/8686791554997599463.JPG
https://cdn.hackaday.io/images/4411331554997605865.JPG
https://cdn.hackaday.io/images/3892361554997605921.JPG
https://cdn.hackaday.io/images/430291554997610043.JPG
Skeleton Attiny85 Handheld | Boom, resin! 2019-04-11 17:45:50
done! :)
https://cdn.hackaday.io/images/8686791554997599463.JPG
https://cdn.hackaday.io/images/4411331554997605865.JPG
https://cdn.hackaday.io/images/3892361554997605921.JPG
https://cdn.hackaday.io/images/430291554997610043.JPG
Skeleton Attiny85 Handheld | Boom, resin! 2019-04-11 17:45:50
done! :)
https://cdn.hackaday.io/images/8686791554997599463.JPG
https://cdn.hackaday.io/images/4411331554997605865.JPG
https://cdn.hackaday.io/images/3892361554997605921.JPG
https://cdn.hackaday.io/images/430291554997610043.JPG
Skeleton Attiny85 Handheld | Boom, resin! 2019-04-11 17:45:50
done! :)
https://cdn.hackaday.io/images/8686791554997599463.JPG
https://cdn.hackaday.io/images/4411331554997605865.JPG
https://cdn.hackaday.io/images/3892361554997605921.JPG
https://cdn.hackaday.io/images/430291554997610043.JPG
Skeleton Attiny85 Handheld | Boom, resin! 2019-04-11 17:45:50
done! :)
https://cdn.hackaday.io/images/8686791554997599463.JPG
https://cdn.hackaday.io/images/4411331554997605865.JPG
https://cdn.hackaday.io/images/3892361554997605921.JPG
https://cdn.hackaday.io/images/430291554997610043.JPG
Skeleton Attiny85 Handheld | Boom, resin! 2019-04-11 17:45:50
done! :)
https://cdn.hackaday.io/images/8686791554997599463.JPG
https://cdn.hackaday.io/images/4411331554997605865.JPG
https://cdn.hackaday.io/images/3892361554997605921.JPG
https://cdn.hackaday.io/images/430291554997610043.JPG
Skeleton Attiny85 Handheld | Boom, resin! 2019-04-11 17:45:50
done! :)
https://cdn.hackaday.io/images/8686791554997599463.JPG
https://cdn.hackaday.io/images/4411331554997605865.JPG
https://cdn.hackaday.io/images/3892361554997605921.JPG
https://cdn.hackaday.io/images/430291554997610043.JPG
Skeleton Attiny85 Handheld | Boom, resin! 2019-04-11 17:45:50
done! :)
https://cdn.hackaday.io/images/8686791554997599463.JPG
https://cdn.hackaday.io/images/4411331554997605865.JPG
https://cdn.hackaday.io/images/3892361554997605921.JPG
https://cdn.hackaday.io/images/430291554997610043.JPG
Skeleton Attiny85 Handheld | Boom, resin! 2019-04-11 17:45:50
done! :)
https://cdn.hackaday.io/images/8686791554997599463.JPG
https://cdn.hackaday.io/images/4411331554997605865.JPG
https://cdn.hackaday.io/images/3892361554997605921.JPG
https://cdn.hackaday.io/images/430291554997610043.JPG
Skeleton Attiny85 Handheld | Boom, resin! 2019-04-11 17:45:50
done! :)
https://cdn.hackaday.io/images/8686791554997599463.JPG
https://cdn.hackaday.io/images/4411331554997605865.JPG
https://cdn.hackaday.io/images/3892361554997605921.JPG
https://cdn.hackaday.io/images/430291554997610043.JPG
Skeleton Attiny85 Handheld | Boom, resin! 2019-04-11 17:45:50
done! :)
https://cdn.hackaday.io/images/8686791554997599463.JPG
https://cdn.hackaday.io/images/4411331554997605865.JPG
https://cdn.hackaday.io/images/3892361554997605921.JPG
https://cdn.hackaday.io/images/430291554997610043.JPG
Skeleton Attiny85 Handheld | Boom, resin! 2019-04-11 17:45:50
done! :)
https://cdn.hackaday.io/images/8686791554997599463.JPG
https://cdn.hackaday.io/images/4411331554997605865.JPG
https://cdn.hackaday.io/images/3892361554997605921.JPG
https://cdn.hackaday.io/images/430291554997610043.JPG
Skeleton Attiny85 Handheld | Boom, resin! 2019-04-11 17:45:50
done! :)
https://cdn.hackaday.io/images/8686791554997599463.JPG
https://cdn.hackaday.io/images/4411331554997605865.JPG
https://cdn.hackaday.io/images/3892361554997605921.JPG
https://cdn.hackaday.io/images/430291554997610043.JPG
Skeleton Attiny85 Handheld | Boom, resin! 2019-04-11 17:45:50
done! :)
https://cdn.hackaday.io/images/8686791554997599463.JPG
https://cdn.hackaday.io/images/4411331554997605865.JPG
https://cdn.hackaday.io/images/3892361554997605921.JPG
https://cdn.hackaday.io/images/430291554997610043.JPG